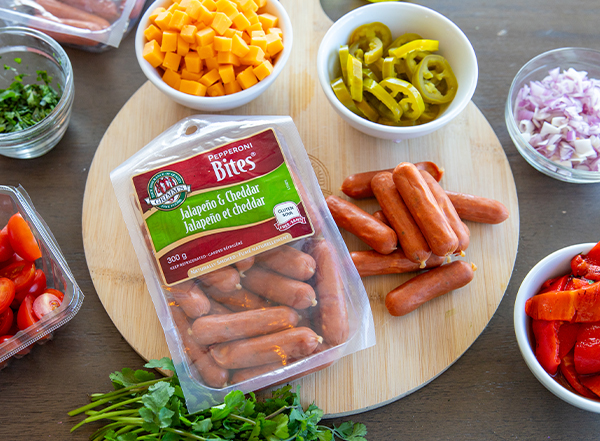
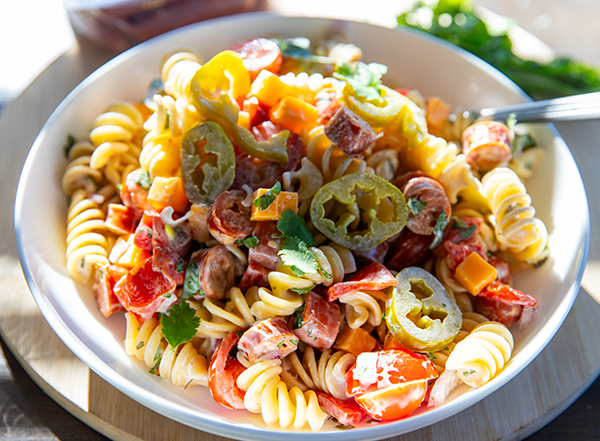
Spring is here, which means barbecue season is just around the corner! Everyone knows Pasta Salad is a staple side dish, so whether you’re bringing it to the potluck or hosting and need an easy and delicious recipe, this Pasta Salad with Jalapeno & Cheddar Pepperoni Bites has you covered!
Plus, the Jalapeno & Cheddar Pepperoni Bites are a 2024 PRODUCT OF THE YEAR* in Canada!
*Survey of 4000 by Kantar.

Ingredients
- 1 package (300g) Grimm’s Jalapeno & Cheddar Pepperoni Bites, chopped
- 1 box (375g) of rotini pasta
- ¾ cup cheddar cheese, cubed
- 1 cup cherry tomatoes, halved
- ½ cup pickled and sliced jalapenos (with brine)
- ¼ cup red onion, diced
- ¾ cup roasted red peppers, diced
For the dressing: - ¾ cup sour cream
- 2 tbsp mayonnaise
- Juice from 1 lime
- ¼ cup cilantro, freshly chopped (reserve some of serving)
- ½ tsp seasoning salt
- ½ tsp freshly cracked pepper
- ½ tsp garlic powder
- ¼ tsp cumin powder
- ¼ tsp smoked paprika
Instructions
- Chop all the pasta salad components and set aside.
- For the dressing, combine all the ingredients and mix well to combine then set aside.
- Cook pasta according to package instructions and set aside to come to room temp.
- In a skillet drizzled in olive oil or cooking spray, gently warm up the Grimm’s Jalapeno Cheddar bites over medium heat (not too hot or they may burst). Allow to cool then chop.
- To a large bowl, add the room temp pasta and mix in the dressing followed by the salad ingredients.
- Add the Grimm’s Jalapeno & Cheddar Pepperoni Bites and finish with cilantro.
- Enjoy at room temp!
Celebrate Valentine’s Day by treating your loved one(s) to our Lasagna with Bacon and Sausage. Whether baked in a heart-shaped pan or a classic 9×13 dish, this indulgent dish is a delicious declaration of love, admiration, and respect. Layers of tender lasagna noodles enveloped in a rich tomato sauce, studded with hearty garlic sausage, earthy mushrooms, and crispy bacon. Every bite encompasses the tantalizing flavours and comforting warmth that make this lasagna a perfect expression of affection.
So, whether enjoying a romantic Valentine’s Day dinner for two, a weeknight family meal, or hosting a Galentine’s get together, this Lasagna with Bacon and Sausage is a heartfelt way to say “I love you” through the joy of food.
Although this recipe will feed 6 to 8, it freezes well and shares even better.
Ingredients
-
1 tablespoon olive oil
-
142 g (5 oz) spinach
-
250 g Grimm’s Thick Cut Bacon
-
227 g cremini mushrooms
-
1 ¼ teaspoons Kosher salt, divided
-
200 g Grimm’s Ham Garlic Sausage, diced
-
1 red onion, diced
-
1 carrot, diced
-
1 celery stalk, diced
-
2 cloves garlic, minced
-
1 teaspoon Italian seasoning
-
½ cup red wine
-
36 ounces pasta sauce, your favourite store bought or homemade
-
2 tablespoons tomato paste
-
Unsalted butter, for buttering the baking dish
-
1 500g box of lasagna noodles
-
1 egg, beaten
-
450 g ricotta cheese (see note)
-
3 ½ cups mozzarella cheese shredded, divided
-
2 ½ cups freshly grated Parmesan, divided
-
¼ cup fresh parsley, chopped
Instructions
- Heat 1 tablespoon of olive oil and the bacon in a large pan over medium heat. Cook, flipping occasionally, until the bacon is crispy, about 12 to 15 minutes.
- Remove the bacon to a paper towel lined plate. Remove 3 tablespoons of the bacon fat to a heat proof bowl and set aside, leaving 1 tablespoon of bacon fat in the pan. When the bacon is cool enough to handle, crumble or chop the bacon into small pieces and set aside.
- Add the spinach to the pan, toss to coat in the bacon fat, cover and cook over medium-high heat, until it wilts. 1 to 2 minutes. Remove spinach to a plate and set aside to cool.
- Dry any excess moisture in the pan with a paper towel, then add the 3 tablespoons of reserved bacon fat into the pan. Add the mushrooms and 1 teaspoon salt to the pan with the bacon fat, and cook over medium-high, stirring occasionally, until the mushrooms are beginning to brown, about 8 to 10 minutes.
- Add the sausage, onion, carrot, celery and cook for 4 minutes. Add the garlic and the Italian seasoning and cook for 2-3 minutes more until the vegetables are soft, and the mushrooms have browned.
- Pour in the wine and deglaze the pan, scraping off any tasty stuck bits. Simmer until the liquid has mostly evaporated, 4 to 5 minutes
- Add in the pasta sauce, tomato paste, and simmer uncovered until slightly thickened, 10 to 12 minutes.
- Stir in the reserved bacon, turn off the heat and set aside.
- While the sauce is thickening, preheat the oven to 350°F and butter a 9”x13” baking dish.
- In a large pot of salted water, boil the lasagna noodles, according to package directions for al dente. Drain the noodles, rinse under cold water, and set aside. (Brushing a little olive oil on the noodles will help keep them from sticking but is completely optional).
- While the noodles cook, whisk the egg and ¼ teaspoon salt in a large bowl. Add the ricotta and stir to combine. Next, add 1 cup mozzarella, ½ cup parmesan cheese, and the parsley. Squeeze the excess water out of the spinach, then coarsely chop the spinach and add it to the egg mixture. Stir until completely incorporated.
- Assemble the lasagna: Spread 1 cup of the meat sauce into a 9”x13″ oven safe dish. Top it with enough lasagna noodles to fit the dish. Layer with 1/3 of the ricotta cheese mixture, 1 cup of meat sauce, then sprinkle with ½ cup of Parmesan cheese. Repeat two more times (noodles, ricotta mixture, sauce, Parma, noodles, ricotta mixture, sauce, Parma) Then finish with a layer of noodles, topped with the remaining sauce. Cover with foil and bake for 45 minutes.
- Remove the foil and sprinkle with the remaining 2 ½ cups mozzarella cheese and ½ cup Parmesan cheese. Bake for an additional 15 minutes or until browned and bubbly. Broil for 2-3 minutes if desired but watch carefully to ensure it does not burn.
- Allow the lasagna to rest for 15 minutes before serving.
NOTES:
- If your ricotta mixture is too thick, add a tablespoon of milk until it is spreadable.
- This recipe makes a 9”x13” three-layer lasagna. A smaller pan, like our heart shaped pan, will make it a five-layer lasagna.
- Optional, bake a heart shaped bacon for garnish.
Do you have any New Year Resolutions? We challenged ourselves to eat healthier! With the help of MasterChef’s Michael Varga (@vargacooks) and our Lean Turkey Pepperoni Bites, we’re able to achieve that resolution with the Lean Turkey Pepperoni Med[iterranean] Bowl!
Ingredients
- Grimm’s Lean Turkey Pepperoni Bites
- 1 red pepper
- 1 cup Kalamata olives
- 2 ripe avocados
- 1 pack halloumi / or 1 cup feta
- 2 cups cooked turmeric rice
- 2 cups of your favourite hummus
- 1 cucumber
- 1 cup cherry tomatoes
- 1 large carrot
- 1 cup spring mix greens
- 1 cup pistachios
- Spicy mayo (optional)
Turmeric Rice Recipe
Ingredients
- 1.5 cups of rice (We recommend Basmati)
- 3 cups water
- 1 teaspoon of turmeric
- 1 tablespoon each of cumin, garlic powder & kosher salt
- 1 large spoon of chicken bouillon or 1 pack of bouillon powder
- kosher salt to taste
- olive oil
Method
- In a sauce pan, toast rice with spices and olive oil until incorporated and heated up. About a minute.
- Pour in water, stir and bring to a boil.
- Once boiled stir for one final mix
- Cover and simmer for 14 minutes
- Remove lid & fluff rice, cover until ready to eat
Instructions
While the rice is cooking, prep the rest.
- Slice the veggies (Cucumbers sliced into rounds, Peppers julienned, Tomatoes cut in half, Carrots shredded)
- Set veggies aside
- Slice the pepperoni on a diagonal – each pepperoni bite sliced into two pieces
- Fry the halloumi in a hot pan. Drizzle oil in a pan, get it hot! Place the halloumi in the pan. Fry for 2 minutes, flip and continue for another 1-2 minutes until both sides are golden. Squeeze lemon juice and remove from pan.
- If using feta, crumble and set aside
- Divide the ingredients and build your bowl, starting with hummus and rice on the bottom. Add all or some of the veggies, pile in the pepperoni & drizzle with your favourite sauce or dressing
- Top with pistachios for some crunch
The Holiday Season is here! We partnered up with MasterChef Canada’s Chanelle Saks (@chezchanelle) to bring you this year’s showstopper. What better way to celebrate with your friends, family, or other loved ones than to show off with this festive Charcu-Tree! Need to impress your significant other’s parents? Or maybe your sister is the reigning charcuterie champion and you need to show her up. Whatever the situation, this Charcu-Tree is sure to be a crowd pleaser!
Ingredients
- Grimm’s Submarine Pack
- Grimm’s Pizza Pack
- Grimm’s Fine Garlic Sausage
- Grimm’s Turkey Kolbassa Sausage
- Grimm’s Honey & Garlic Pepperoni Bites®
- Grimm’s Lean Turkey Pepperoni Bites®
- Grimm’s Original Pepperoni
- Cheddar + Monterey Jack Cheese, Cubed
- Mini Mozzarella Balls
- Red and Green Grapes
- Cashews
- Rosemary for Garnish
Instructions
- Start by cutting out the Grimm’s deli meats and cheese using cookie cutters. Slice the sausage rings and set aside.
- Place the rosemary on each level of the tree board.
- From the base up, start by placing the sliced sausage ring, alternating flavours between the Kolbassa and Fine Garlic.
- Next add the cheese cubes followed by the Honey Garlic Pepperoni Bites.
- Add the grapes, alternating between red and green.
- Fold the Pizza Pack deli meats into a rose shape and use rosemary to secure the shape.
- Add the mini mozzarella balls, Lean Turkey Pepperoni Bites, grapes, and sausage, alternating flavours again.
- Finish the tree with cashews at the top and arrange the cut out deli meats and cheese like ornaments.
- Use one Original Pepperoni cut in half as the tree base.
- Enjoy!
Who doesn’t love a good cheesy quesadilla? It’s sure to be a crowd-pleaser at any Game Day festivities!
Ingredients
- 1 Grimm’s Polish Sausage
- 4 Grimm’s Wraps any style (We used Spinach and Flour & Corn Blend)
- 2-3 Mixed peppers (red, yellow, orange)
- Smoked Cheddar Cheese
- Chili Crisp Oil
Instructions
- Slice and sauté Polish Sausage and peppers until the peppers are slightly cooked but still crisp & the sausage is crisp around the edges. Remove from the heat and let cool slightly.
- Spread over 1 half of the large wrap, sprinkle with lots of cheese & drizzle with your favourite chili oil.
- Fold it over. Place it in a preheated pan on medium-high with 2 tbsp of neutral flavoured oil.
- Crisp one side and flip to the other, crisping it up as well.
- Remove from heat and cut into 4.
- Serve with your favourite salsa or guacamole.
What’s a more classic Game Day snack than sliders? We teamed up with Michael Varga (@vargacooks) to make the ultimate Game Day Sliders, but with a twist; they’re made with Kolbassa Sausage!
Ingredients
- 1 Grimm’s Kolbassa Sausage
- Slider buns
- 4 medium yellow onions
- 4 mixed peppers
- 2 jalapeño (optional for a kick)
- Jalapeño cheese sauce or smoked cheddar (if you love cheese, add both!)
Cheese Sauce:
- 2 tbsp of butter and flour
- 1/2 jalapeño diced with seeds taken out
- 1 cup milk
- 1.5 – 2 cups of your favourite shredded cheese (old cheddar would be great)
- Salt and pepper to taste
Instructions
- Slice and sauté the peppers and onions in a pan with a little oil and a pad of butter. Sprinkle with kosher salt. Cook the onions & peppers until soft (approximately 10-12 minutes).
- Add in the Kolbassa Sausage and smoked cheddar. Continue to cook until the sausage is cooked through and the cheese is melted (approximately 5 minutes).
- Slightly toast the buns.
- Build the sliders and drizzle with cheese sauce.
Cheese Sauce:
- Melt butter in a sauce pan on medium heat with the diced jalapeño until the butter is melted and jalapeño is slightly cooked.
- Add in flour and mix until it forms a smooth paste.
- Stir in milk and incorporate. Stir until mixture thickens up (about 5 minutes).
- Stir in shredded cheese and mix until smooth.
- Add salt and pepper to taste.
- Optional: For a kick, you can add spices to the flour/butter mixture (e.g., smoked paprika, Cajun spice, etc.).
It’s Game Day! And that means finger foods are the talk of the town – just make sure you make enough to share!
These Game Day Sausage Tacos are the perfect snack to whip out at your Game Day Get Together – this recipe is courtesy of the talented Michael Varga (@Vargacooks).
Ingredients
- 1 Grimm’s Polish Sausage Ring
- 4”or 6” flour tortilla ( can use corn )
- 1 cup shaved purple cabbage
- Pickled red onion
- Pickled jalapeño
- Feta or cojita cheese
- Fresh lime
- Chipotle sour cream ( or regular )
Salsa:
- 1 cup diced Pineapple
- 1/4 cup diced red onion
- 1/2 cup diced red pepper
- Cilantro to taste
- Salt and pepper to taste
- Juice from 1/2 lime
Instructions
- Slice the Polish Sausage into rings and sauté with a little bit of oil until they are cooked through with a little bit of crispness around the edges.
- Shave the cabbage thinly, then add a squeeze of lime juice and a pinch of salt.
- To make the salsa, simply combine the ingredients! You can make this an hour before and refrigerate to let the flavours develop.
- Add 2 cups of water & 1 cup of red wine vinegar into a small pot. Bring to a boil and dissolve 2 tablespoons each of kosher salt and sugar. Once it’s all incorporated, pour this mixture over the pickled red onion and jalapeño in a hot liquid safe container. At least 1 hour before serving.
- Build the taco, use your favourite sauces, & enjoy!
Thanksgiving is a time for family, gratitude, and of course, delicious food. While turkey might traditionally be the food of Thanksgiving, this impressive and delicious Ham Wellington adds a twist to your Thanksgiving feast. It might sound intimidating, but @ZimmysNook says that with the store-bought puff pastry and a little patience, it’s simpler than you may think!
With the combination of Grimm’s Honey & Maple flavoured Ham, mustard, shredded cheese, and fresh thyme all wrapped in a blanket of flaky puff pastry, this dish is sure to impress your guests.
This recipe is great for gatherings of four but can be easily doubled to serve eight.
Ingredients
-
1 – 700g Grimm’s Honey & Maple Flavoured Ham, naturally smoked and extra lean
-
1 – 400g package of puff pastry, thawed and kept cold
-
1 tablespoon stone ground mustard
-
3/4 cup mozzarella cheese, shredded
-
1/3 cup Pecorino Romano cheese, freshly shredded (or Parmesan)
-
2 teaspoons fresh thyme, chopped
-
1 egg, beaten
Instructions
- Preheat the oven to 375°F, with the oven rack in the centre.
- Remove the ham from the packaging and pat dry with paper towels.
- Roll out puff pastry on a lightly floured surface, into a 13”h x 11” w rectangle. Next, trim the puff pastry into a cross “+” by cutting out 4 ¼”h x 3” w rectangles in the corners. See diagram.
- Brush the edges with the egg wash, approximately 1” wide.
- Spread the mustard on the inside of the pastry, within the egg wash border. Next sprinkle both the cheeses and thyme evenly over the mustard.
- Place the ham upside down in the centre of the pastry, with the cut side facing the shorter piece of the “+”. Then fold the pastry over the ham, using more egg wash if necessary to secure each fold.
- Once complete, turn the ham (with seams facing down) and place on a parchment paper lined sheet pan. Brush the entire pastry with the remaining egg wash.
- Place the sheet pan in the fridge for 30 minutes or freezer for 15 minutes. This is a crucial step, puff pastry needs to be chilled, when going into the hot oven in order for it to rise properly. Chilling the pastry ensures the buttery layers remain separate and flaky.
- Place the wellington in the oven and cook for approximately 1 hour or until it is golden brown, and the ham is heated through.
- Slice, then serve with extra mustard and garnish with fresh thyme. Try serving it with Holiday Stuffing with Country Classic Sausage.
Back to school hits hard for families! Busy schedules, extra-curricular activities, and packed lunches! Here’s a packed lunch hack from Michael Varga (@Vargacooks) to help keep those lunches fresh and tasty. Send it to school or take it to work; this Club Sandwich brings the Canadian flavours of Smoked Turkey Breast, Canadian Back Bacon, and Honey Ham into one convenient and delicious sandwich the whole family will enjoy.
It’s so easy to make! Just grab your favourite bread and stack these ingredients, starting with Smoked Turkey Breast, Canadian Back Bacon & Honey Ham.
Welcome to “the Club” everyone!
Ingredients
- 1 Grimm’s Canadian Clubhouse pack
- Bread, bun or roll
- 1 Roma tomato sliced
- iceberg lettuce
- 1 Avocado sliced
- Smoked cheddar cheese sliced
- Mayo to taste ( optional spicy mayo for a kick )
Skip the lines at the fair and make these super fun and delicious DIY Corn Dogs with our Grimm’s Sizzlin’ Wieners. 🎪🌭 The kids are in for a treat and you’ll be surprised at how tasty they are! Pair with other picnic and fair food for an inspired afternoon! Whether it’s a birthday bash, back-to-school shindig, or simply a day of family fun, these corn dogs are a hit. Full recipe below by Chez Chanelle
Ingredients
For the Corn Dogs:
- 8 Grimm’s Sizzlin’ Wieners
- 8 sticks
- Vegetable oil for frying
For the batter:
- 1 ¼ cup fine yellow cornmeal
- 1 cup all-purpose flour
- 2 tbsp granulated sugar
- 2 tsp baking powder
- ¼ tsp salt
- 1 ½ cups buttermilk
- 1 medium egg
- 2 tsp honey
- 2 tsp vegetable or olive oil
Preparation
- Pour 2-3 inches of oil into a large pot or dutch oven and heat to 350˚F over medium heat.
- Pat the wieners thoroughly dry with paper towels and insert sticks into hot dogs.
- Whisk together dry ingredients (cornmeal, flour, sugar, baking powder and salt) and set aside.
- Whisk together wet ingredients (buttermilk, egg, 1 Tbsp oil and honey).
- Combine wet and dry ingredients and whisk to combine.
- Pour the batter into a drinking glass almost to the top and dip the wieners in one by one. Put the corndog straight down into the batter and give it a little twirl to fully coat the wiener then swirl as you lift. Let excess drip off.
- Hold corn dog at an angle in the hot oil for 5-7 seconds to let it seal then drop into oil (this keeps them from sticking to the bottom of the pot).
- Fry for 3 minutes or until golden brown. Fry up to 2-3 at a time (you don’t drop the temperature), turning them as needed to brown evenly. Transfer to a wire rack to cool.
- Allow to cool slightly then serve with ketchup and mustard.
These easy pull apart Ham Garlic Sausage and Pineapple Salsa Sliders by @Zimmysnook are the best appetizer for relaxed nights hanging out with friends and family. A soft Hawaiian butter roll, loaded with Grimm’s Ham Garlic Sausage, a healthy squeeze of chipotle aioli, and yellow mustard topped with grilled pineapple salsa and cheese creates an ooey, gooey, cheesy on the inside, golden, and toasted on the outside slider you won’t soon forget! Serve them warm because nothing beats a melty, messy pull-apart slider!
Ingredients
- 1 300g Grimm’s Ham Garlic Sausage
- 1 package 340g 12-Hawaiian butter rolls (or slider buns)
- 6 slices of mozzarella
- 6 thin slices of provolone
- Chipotle-Lime Aioli
- Mustard
- Pineapple Salsa
- Garlic Butter (homemade or store bought)
Pineapple Salsa
- 1 cup pineapple, grilled and chopped (approximately 6 pineapple circles sliced ½” thick)
- ¼ cup red onion, chopped
- 1 small jalapeño, sliced thinly
- ½ cup red pepper, chopped
- ¼ cup basil, chopped
- Juice of ½ lime
- Salt to taste
For Serving, optional
- Fresh basil
- Pickled jalapeños
- Pickled hot peppers
Preparation
Grill the Sausage:
- Preheat the grill to medium-high.
- Score the sausage (on one side) diagonally, every ½ inch. Grill the sausage on both sides for 6-8 minutes or until nicely charred on both sides. When cool enough to manage, slice the sausage through the precut scores.
Pineapple Salsa:
- Grill the pineapple slices for about 4-5 minutes or until light grill marks appear, flipping halfway through.
- When the pineapple is cool enough to manage, remove the center core and slice into small cubes. Place into a medium bowl. Then add the red onions, jalapeño slices, red pepper, basil, lime juice, a sprinkle of salt and mix until combined. Set aside.
Build the Sliders:
- Slice the Hawaiian buns (if necessary) keeping the top and bottoms together if possible. Grill/toast the inside of the buns until golden about 1-3 minutes depending on how hot your grill is.
- Spread a layer of aioli on the bottom bun. Next, layer on the mozzarella slices. Then place the sausage on (two slices per bun). Drain the salsa of excess liquid, then add a small portion of salsa on each bun. Layer on the provolone, then spread mustard on the inside of the top buns and place over the provolone. Brush the top of the buns with garlic butter.
Melt the Cheese:
- Turn off one side of the grill and leave the other on medium heat.
- Wrap the sliders in aluminum foil and place on a sheet pan. Place them on the side of the grill without heat and close the lid. Cook for 10-15 minutes or until the cheese has just begun to melt. Unwrap the top of the foil and cook for 10-15 minutes more until the buns are golden and the cheese is oozing.
- Serve warm with extra salsa on the side. Have your guests pull them apart and enjoy!
TikTok made us try it! We had to try this sandwich for ourselves after seeing it go viral. Chanelle Saks, @chezchanelle created our very own Grinder Sandwich with our brand new Grimm’s Signature Deli Pack. Try for yourself and tell us what you think!
Ingredients
- 1 Grimm’s Signature Deli Pack
- 2 cups iceberg lettuce, shredded
- ¼ of a red onion, thinly sliced
- ⅓ cup pickled banana peppers (or to taste)
- 1 tsp red wine vinegar
- Salt and Pepper to taste
- 3 tbsp mayonnaise
- 1 tbsp deli mustard
- 2 fresh sandwich buns, buttered
- ¼ cup freshly grated parmesan or asiago cheese
- Tomato slices (optional)
Preparation
- Preheat the broiler to high heat. Meanwhile, make the filling by combining the lettuce, red onion, banana peppers, red wine vinegar, salt, pepper, mayonnaise, and mustard. Stir until well combined and set aside.
- Butter the buns and cover in grated cheese. Place open-faced under the broiler for about 2-3 minutes until the buns are toasted and the cheese is bubbly.
- Assemble the sandwich with the meats from the Grimm’s Signature Deli Pack followed by the lettuce mixture and top with sliced tomatoes. Enjoy IMMEDIATELY with a big side of napkins!